Reviving A Maplin 4600 DIY Synthesizer From The 1970s

A piece of musical history is the Maplin 4600, a DIY electronic music synthesizer from the 1970s. The design was published in an Australian electronics magazine and sold as a DIY kit, and [LOOK MUM NO COMPUTER] got his hands on an original Maplin 4600 that he refurbishes and puts through its paces.

Inserting conductive pegs is how the operator connects different inputs and outputs.

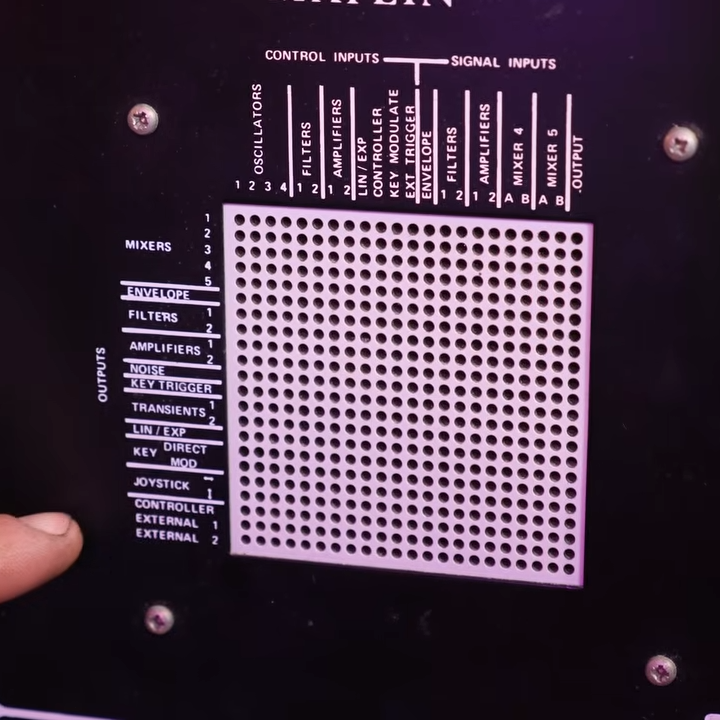
The Maplin 4600 is a (mostly) analog device with a slightly intimidating-looking layout. It features multiple oscillators, mixers, envelope generators, filters, and a complex-looking patch bay on the right hand side that is reminiscent of a breadboard. By inserting conductive pins, one can make connections between various inputs and outputs.

Internally the different features and circuits are mostly unconnected from one another by default, so the patch board is how the instrument is “programmed” and the connections made can be quite complex. The 4600 is one of a few synthesizer designs by [Trevor Marshall], who has some additional details about on his website.

The video (embedded below) is a complete walk-through of the unit, including its history, quirks, and design features. If you’d like to skip directly to a hands-on demonstrating how it works, that begins around the 10:15 mark.

Synthesizers have a rich DIY history and it’s fascinating to see an in-depth look at this one. And hey, if you like your synths complex and intimidating, do yourself a favor and check out the Starship One.

Continue reading “Reviving A Maplin 4600 DIY Synthesizer From The 1970s”

Probably The Simplest Sequencing Synth

With inexpensive microntrollers capable of the most impressive feats of sound synthesis, it’s not so often we see projects that return to an earlier style of electronic music project. The 1-bit synth from [Electroagenda] takes us firmly into that territory, employing that most trusty of circuits, a 555.

It’s a time-honored circuit, a 555 provides a note clock that drives a 4017 that functions as a sequencer. This switches in a set of voltage dividers, which in turn control another 555 oscillator that produces the notes. It’s a fun toy straight from the 1970s, right down to the protoboard and hookup wire construction. There’s a demo video with some lovely beeps below, and we think most of you should have what it takes to make your own.

If you’re seeking more inspiration, may we introduce you to our Logic Noise series?

Continue reading “Probably The Simplest Sequencing Synth”

Newspaper clipping with words 'speaking personally' and a photo

A Fast Rewind To The Era Of Tapesponding

Imagine a time before Discord servers and cheap long-distance calls. Back in the 1950s, a curious and crafty group of enthusiasts invented their own global social network: on reels of magnetic tape. They called it tapesponding (short for tape corresponding), and it was a booming hobby for thousands of radio hams, tinkerers, and audio geeks. Here’s the original video on this analog marvel.

These folks weren’t just swapping mixtapes. They crafted personal audio letters, beamed across the globe on 3-inch reels. DIY clubs emerged everywhere: World Tape Pals (Texas-based, naturally) clocked 5,000 members from “every Free Nation” – which frames it in a world in terms of East vs. West. Some groups even pooled funds to buy shared tape decks in poorer regions – pure hacker spirit. The tech behind it: Speeds of 3¾ IPS, half-track mono, round-robin reels, and rigorous trust networks to avoid ghosters. Honestly, it makes IRC net ops look soft. Tapesponding wasn’t just for chatty types. It fostered deep friendships, even marriages. It was social engineering before that term was coined. The video is below the break.

What are your thoughts on this nostalgic way of long-distance communication? The warm whirring of a spinning tape reel? The waiting time before your echo is returned? Or are have you skipped all the analog mechanics and shouted out into the LoRaWAN void long ago?

Continue reading “A Fast Rewind To The Era Of Tapesponding”

EPROM-based Enigma Machine

The Enigma machine is perhaps one of the most legendary devices to come out of World War II. The Germans used the ingenious cryptographic device to hide their communications from the Allies, who in turn spent an incredible amount of time and energy in finding a way to break it. While the original Enigma was a complicated electromechanical contraption, [DrMattRegan] recently set out to show how its operation can be replicated with an EPROM.

The German Enigma machine was, for the time, an extremely robust way of coding messages. Earlier versions proved somewhat easy to crack, but subsequent machines added more and more complexity rendering them almost impenetrable. The basis of the system was a set of rotors which encrypted each typed letter to a different one based on the settings and then advanced one place in their rotation, ensuring each letter was encrypted differently than the last. Essentially this is a finite-state machine, something perfectly suited for an EPROM. With all of the possible combinations programmed in advance, an initial rotor setting can be inputted, and then each key press is sent through the Enigma emulator which encrypts the letter, virtually advances the rotors, and then moves to the next letter with each clock cycle.

[DrMattRegan]’s video, also linked below, goes into much more historical and technical detail on how these machines worked, as well as some background on the British bombe, an electromechanical device used for decoding encrypted German messages. The first programmable, electronic, digital computer called Colossus was also developed to break encrypted Enigma messages as well, demonstrating yet another technology that came to the forefront during WWII.

Continue reading “EPROM-based Enigma Machine”

FlyingCam Is A Sweet DIY Webcam On A Stick

Imagine you want to monitor a pot on the stove to see if it’s boiling over for just a few minutes, but you don’t want to have a dedicated permanent IP webcam solution in your kitchen. [Sebastian Duell]’s FlyingCam hijacks an IKEA lamp gooseneck to become something you never knew you needed: a wireless camera for short-term random remote observation. It’s a beautiful combination of 3D printing and commercial device re-use, and when paired with his DIY wireless screen, it’s a complete solution.

The guts of this project aren’t critical, or expensive. It’s built around one of those ESP32 single-board webcams, with an added fan, battery pack, antenna, and a power switch. You turn it on, and the AP in the ESP32 fires up, or optionally connects to your network. Point the camera at your target and you’re set, at least if you want to sit by your computer. But [Sebastian] also designed a nice simple remote screen, so you can keep tabs on your spaghetti wherever you roam around the house.

We love the attention to keeping the design simple here, both in form and in function. It’s a one-task device, so it’s important that it be extremely easy to use, and it’s hard to beat just pointing the thing and turning on a switch. And it doesn’t hurt that it’s good looking to boot.

IKEA stuff is cheap and cheerful, but often it’s missing just that one functionality that we want. What good is an air-quality sensor without MQTT logging capability, for instance? Or a standing desk that can’t remember set heights? Get hacking!

A Magic Eye Tube Does All The Work In This Kit

We’re used to low cost parts and a diversity of electronic functions to choose from in our projects, to the extent that our antecedents would be green with envy. Back when tubes were king, electronics was a much more expensive pursuit with new parts, so designers had to be much more clever in their work. [Thomas Scherrer OZ2CPU] has just such a design on his bench, it’s a Heathkit Capaci-Tester designed in 1959, and we love it for the clever tricks it uses.

It’s typical of Heathkits of this era, with a sturdy chassis and components mounted on tag strips. As the name suggests, it’s a capacitor tester, and it uses a magic eye tube as its display. It’s looking for short circuits, open circuits, and low equivalent resistance, and it achieves this by looking at the loading the device under test places on a 19 MHz oscillator. But here comes that economy of parts; there’s no rectifier so the circuit runs on an AC HT voltage from a transformer, and that magic eye tube performs the task of oscillator as well as display.

He finds it to be in good condition in the video below the break, though he removes a capacitor placed from one of the mains input lines to chassis. It runs, and confirms his test capacitor is still good. It can’t measure the capacitance, but we’re guessing the resourceful engineer would also have constructed a bridge for that.

Continue reading “A Magic Eye Tube Does All The Work In This Kit”

Red and gold bakelite Philco farm radio on a workbench

Hacking A Heavyweight Philco Radio

There’s something magical about the clunk of a heavy 1950s portable radio – the solid thunk of Bakelite, the warm hum of tubes glowing to life. This is exactly why [Ken’s Lab] took on the restoration of a Philco 52-664, a portable AC/DC radio originally sold for $45 in 1953 (a small fortune back then!). Despite its beat-up exterior and faulty guts, [Ken] methodically restored it to working condition. His video details every crackling capacitor and crusty resistor he replaced, and it’s pure catnip for any hacker with a soft spot for analog tech. Does the name Philco ring a bell? Lately, we did cover the restoration of a 1958 Philco Predicta television.

What sets this radio hack apart? To begin with, [Ken] kept the restoration authentic, repurposing original capacitor cans and using era-appropriate materials – right down to boiling out old electrolytics in his wife’s discarded cooking pot. But, he went further. Lacking the space for modern components, [Ken] fabbed up a custom mounting solution from stiff styrofoam, fibreboard, and all-purpose glue. He even re-routed the B-wiring with creative terminal hacks. It’s a masterclass in patience, precision, and resourcefulness.

If this tickles your inner tinkerer, don’t miss out on the full video. It’s like stepping into a time machine.

Continue reading “Hacking A Heavyweight Philco Radio”